Making a beautiful mosaic countertop for the bathroom. Making a mosaic tabletop with your own hands: work order Round mosaic table for a summer residence
Mosaic is one of the oldest ways to decorate a room. Traditionally, the material is used to decorate walls and floors; less often, paintings are made from it. The range of technology applications has expanded significantly over time, mosaic tiles V Lately often used for pasting tables. It is worth noting that making a countertop with your own hands is not difficult; it requires minimal skills and a lot of patience.

There is quite a large number of types of mosaics. The most common are the following:
- Glass;
- Ceramic;
- Stone;
- Metal;
- Wooden;
- Porcelain stoneware.
Most the best option According to experts, the combination of colored glass with flexible tiles is considered. Flexible tiles are products made from crumbs processed to match a certain texture of brick or stone.


Advantages of flexible tiles:
- Moisture resistance;
- Long service life;
- Mechanical strength;
- Frost resistance;
- Resistance to aggressive environments;
- Preservation of color under the influence of moisture and sunlight.
The spectacular artistic image of the mosaic is ensured by its aesthetics and ease of installation; the material is ideal for covering the tabletop with a mosaic with your own hands.
Features of mosaic countertop finishing


Mosaic looks great in the kitchen; this decoration option perfectly refreshes the interior and makes it more original and bright. With proper care, the countertop will retain its original appearance for many years. It is not recommended to glue mosaic tiles to a set that is not very new - it is better to replace the old countertop with a new one.
You can purchase a new countertop at a building materials store. It can also be used as a board made of polyurethane foam of different thicknesses.
To make measuring and cutting easier, a centimeter grid is sometimes applied to the board.
A stainless steel profile can also be sold as a kit, which is glued to the edge of the product using the same glue as the mosaic. The glue used is a standard elastic composition; for glass mosaics, transparent or white glue is used, which is suitable for installing tiles of any color. This glue also functions as a sealant, which is ideal for kitchen furniture. Mosaic flooring involves many joints, which can lead to the formation of mold. To avoid this, special anti-fungal cleaners are used to clean the countertop.
How to decorate a countertop with mosaics

There are three main ways to make a tabletop with your own hands:
First way:
- Stage 1. The tabletop is cut out of the slab according to the dimensions, and its profile edge is also prepared. The edge with the perforated part up is placed on the edge of the board;
- Stage 2. The selected adhesive is applied to the surface and leveled using a notched trowel; the adhesive should also be applied to the upper edge of the profile;
- Stage 3. The upper perforated profile is laid on glue, which forms the edge of the tabletop;
- Stage 4. After the glue has dried, pre-cut tiles in the form of squares are laid on the surface. The same glue can be used as a sealant; a small part of it is rubbed over the surface of the countertop to grout the joints;
- Stage 5. Excess dried glue is wiped off with a damp cloth.
The finished tabletop is polished to a shine with a soft cloth; no additional coating is required, you only need to comply with the conditions for the care and use of mosaic surfaces.


Second way:
If the decor of the tabletop with your own hands does not involve complex artistic compositions, it is recommended to use the method of transferring drawings from paper to the tabletop.
- Stage 1. The mosaic sheet is carefully laid on a pre-prepared adhesive base, the paper layer should be on top;
- Stage 2. The paper is carefully blotted with a damp cloth until it begins to easily separate from the surface of the mosaic;
- Stage 3. Remains of paper are removed without unnecessary effort, which can cause a shift in the position of the elements;
- Stage 4. After removing the paper base, the design must be left for a day, after which the joints are grouted;
- Stage 5. Excess grout is removed with a damp cloth.

Third way:
This method is considered the simplest; it involves laying mosaics using a mesh.
- Stage 1. The mesh base is immersed in the adhesive solution; this must be done so that all its parts are evenly immersed to the same depth;
- Stage 2. The pattern hardens over the course of a day, after which grout is applied;
- Stage 3. To remove excess traces of grout that cannot be removed with a sponge or damp cloth, it is recommended to use light solvents (such as White Spirit). Solvents should be used a week after completion of work;
DIY mosaic installation in the kitchen (video)
All methods of making a countertop with your own hands have their advantages; with their help you can decorate any kitchen. It is not necessary to buy a mosaic; a beautiful pattern or paintings can be created from fragments of broken tiles or bottles.
Examples of mosaic countertops in the kitchen (photo)


_Stoleshnica_iz_mramornoy_mozaiki_.jpg)


Since ancient times, mosaic tiles have been used to decorate the walls of temples and palaces, but now the possibilities for using this material are much wider. Today, make the bathroom, kitchen or any other room stylish, if it allows free space, a mosaic tabletop made by yourself will help you. In addition, you can make copyright coffee tables for home.
Let's take a closer look at the production of tile countertops. To do this, choose glass, ceramic, stone, metal, wood and other types of tiles.


Peculiarities
Every year the cost of furniture and building materials is only increasing, so updating the interior regularly is not possible for everyone. Particularly deformed over time kitchen furniture. There is no need to be upset; there is an excellent solution for such a case. Mosaic tiles will help you save, renew, decorate your old kitchen set or other surfaces and will add originality and freshness to the interior.
The mosaic represents tiles, the dimensions of which are determined from one and a half to 2.5 cm. The shape of the fragments can be very diverse. They can be square, triangular, rectangular, round and any other arbitrary shape.


Mosaic for cladding various surfaces in the interior it is divided into the following types:
- glass is the most used type, main feature which are low price and different types designs (matte, transparent, colored, gold and silver, with various shades and additions);
- metal mosaic;
- ceramic - it happens: in the form of cut sheets of porcelain stoneware and ceramic tiles;
- stone - from lapis lazuli, jasper, marble, travertine;
- smalt tiles are the most expensive type, but at the same time high-quality and reliable.


Reliability and unusual appearance are what distinguish mosaic countertops. This decorative solution is ideal for decorating the living room, bathroom and other rooms. Small tiles make up a picture or a beautiful pattern.
Please note that such a tabletop has considerable weight, so it is necessary to pay attention to the reliability, strength and stability of the base.


How to do it yourself?
To begin with, decide on a specific location area. Most often, the following options are chosen: a transition between furniture, a mosaic coffee table, and simply a mosaic surface. All tile finishing options are an excellent solution for your interior. It is used to decorate the living room, finish the apron and countertops in the kitchen, but it is not recommended to lay mosaics on an old set.
Sometimes, to expand the working area in the kitchen, the window sill is decorated with mosaics. But the most options for using such tiles can be found in the bathroom. For example, it is used to disguise washing machine, decorate the walls, link the washbasin with the screen.


Keep in mind that constructing a tile table requires dexterity and some experience, although it appears to be a routine task. The following materials are ideal for the base: concrete, wood materials with good moisture-resistant impregnation, water-resistant plasterboard surfaces, dense polyurethane.
It is worth noting that you can make a mosaic yourself. You just need to make fragments of glass that are suitable in shape and color. And glass fragments can be obtained from any sales company Supplies and colored glass for stained glass. This is a great way to try something new and get passionate about it.


To fold the tiled surface you will need:
- grout for seams;
- primer;
- putty;
- antiseptic.
Tools:
- putty knife;
- container for mixing glue;
- container for mixing grout;
- rags;
- sandpaper;
- soft spatula for grouting joints.


In order for the mosaic tiles to be firmly fixed on the table, special adhesive mixtures. Experts recommend choosing plastic mixtures white. You can use any adhesive mixtures for tiles, but only when laying opaque mosaics. For glass tiles you need to choose only transparent or white mixtures.
Before starting work, you need to treat the surface so that base defects are not noticeable in the future.


Surface preparation
Before laying the tiles, it is necessary to level the surface using putty. Next, the surface must be cleaned and degreased. To protect the surface from the appearance of mold and mildew, it is necessary to cover it with antiseptic impregnation. The next step is to apply the primer.


Laying out the mosaic
The process is a bit similar to making stained glass using the Tiffany technique. Before you start laying tiles, be sure to lay them out on the table and form the pattern you want. So you can evaluate possible variant and, if necessary, correct something.
It is recommended to start laying the mosaic from the near edge of the tabletop. Thus, if it is necessary to trim elements, it will take place on the far side and will not involve special attention. But if you are sure that pruning will not be necessary, then you need to start from the far side. If the mosaic should form a certain pattern, then lay it out from the center of the tabletop.
There are no rules for laying tiles as such; the main thing in this process is to think through the design and number of elements in advance.


Operating procedure:
- Prime the surface in two layers.
- Apply a small amount of glue to level the surface.
- A special mesh is laid, and tiles are placed on top of it. It is leveled (you can also use paper instead of a grid; it will get wet and be removed later). But be sure to think over the design before laying out the tiles, and draw it first on a sheet at a scale of 1:1, and later on the surface, in order to protect yourself from an undesirable result.
- Next, the result of decorating the surface must be covered with grout. It will make the finished coating more reliable, stronger and more durable. Apply it to the seams with a soft spatula and rub in thoroughly. It is necessary to leave the surface until completely dry, and do not use a hair dryer or other heating methods. The rule is this: the tile will stick to the surface more firmly if it takes longer to dry.


- Excess dried composition is removed from the mosaic using a dry soft cloth. Sometimes, when the mixture dries out very much, it becomes necessary to use sandpaper with the finest grains.
- Polishing tiles. For this purpose, furniture wax is used. It is necessary to apply it to a soft, lint-free cloth and thoroughly rub into the tile elements.
- Wait until the surface is completely dry. This usually takes about a day.


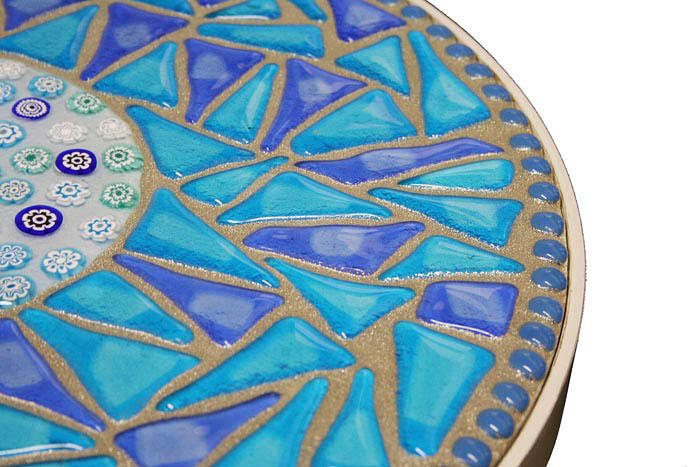
If you are not confident in your abilities to create complex patterns and paintings, then experts recommend using a circular pattern. To perform it, you need to draw diverging circles from the center of the surface. The shape of the elements doesn't really matter, the only important thing is that the small elements are located closer to the center, and the large ones towards the edges.
This project took almost a year from the beginning to the state in the bottom photo. In the kitchen we had a very shabby table, which we received with the apartment. In the original it was also shabby, but still light color. I, foolishly, painted it with dark varnish and not only did not improve it, but, perhaps, worsened its appearance and compliance color scheme in the kitchen.
For several years I matured until I became completely ashamed of such disgrace in my rather neat apartment. And then I became interested in mosaics and saw all sorts of beautiful things made by others. So I was inspired to create something unique and stunningly beautiful :).
Before starting work on creating this mosaic on the table, I had never cut glass (especially stained glass) and had practically never tried my hand at mosaics, except for the one and the one. During this year, while I was long and persistently cutting glass into hundreds of leaves and petals, I made several more mosaic works:
So, here's what the table looked like BEFORE:
Materials: stained glass (Tiffany and mirror) of different colors and glass tiles of two shades, universal glue, wood glue, acetate film, grout.
Do-it-yourself mosaic tabletop - stages of work
The first stage of work is creating a sketch. To do this, I cut out a piece of paper in the shape of the table and drew on it the main motif with leaves, flowers and birds.
Then I laid out acetate film on the sketch, gluing its sheets with tape and a mesh on top. On this grid I began to lay out and glue leaves and petals cut out of stained glass - directly according to the drawing.
Of course, I cut it out by eye, and during the gluing process I slightly changed the direction of the stems or the number and shape of the leaves, but, in general, I followed the sketch.

The next step was for my husband to clear the table. grinder, removing a layer of old varnish from it. And then I separated (torn off) the mesh with the floral motif from the acetate film, cut out the motif along the contour and, placing it on the table, glued it together with the mesh on which it sat. Here it is very important to cut the mesh as close to the glass as possible, so that later it does not interfere with neighboring tiles and does not create a height difference.

The third stage is to fill the table space between the floral motif with glass tiles. We bought tiles glued alternately (dark and light) onto a grid. We tore it off the grid and sorted it. The mesh was used at the first stage of work. Here, first I glued a border of dark tiles along the contour of the table, and then filled the rest of the space with light tiles.


The last stage is applying grout. I used Eifel grout in two shades - yellow (I don’t remember the number) and light gray (number 16). The result is a light yellow tone. First I tested it on a small area of mosaic, and when I was sure that the shade suited me, I spread the grout over the entire table. I especially love this stage because... This is the last one, and soon the final result will be visible. But here there is a danger of not choosing the color of the grout and ruining the whole job. I will share various tricks about this in future posts.

And here’s how the table with mosaics looked AFTER

Rising prices for necessary interior elements are forcing many lovers of coziness and comfort to look for alternative solutions. To create a comfortable, reliable, functional countertop, many people use mosaics.
The mosaic table top has a mass positive aspects. The main advantage is the ability to do it yourself. In this article we will tell you about some of the nuances of this work, and in conclusion we invite you to watch the prepared video material, which will reinforce the whole theory of how to make a table from a mosaic.
Several variants
First you need to clearly determine the location of the cladding. Based on the conditions, a do-it-yourself mosaic tabletop can:

- resemble a small table;
- transition from one furniture to another;
- separate tabletop.
For example, a table with a mosaic will be a beautiful addition to the created interior of any room, either in the living room or in the veranda. If this is a kitchen, then in combination with an apron, this will be an excellent solution. Also finish the window sill in the kitchen, which will become an extension of the work area.

The base for the cladding can be made from a variety of building materials. For example, dense polyurethane, plywood or other similar sheet material, concrete, plasterboard (moisture resistant).
Important! When making mosaic countertops, it is unacceptable to use ordinary drywall as a base. It is necessary to use only moisture-resistant, it has a green color.
Tools
Before making a tabletop, it is necessary to carry out high-quality preparation and collection of tools. In many ways, the choice of tool is influenced by the base material for the mosaic.

So, for work you will definitely need:
- Antiseptic.
- Primer.
- Adhesive composition.
- Mosaic.
- Grout for seams.
Considering the peculiarities of using a mosaic table, it is necessary to choose the right adhesive composition. It must be plastic. Many experts recommend using white glue.
Especially if the lining is transparent. If the tiles are opaque, then regular tile adhesive is acceptable. A transparent adhesive has also been developed for glass tiles. When using it, it is important to prepare the base very well. It should be free of all kinds of defects.

Special attention is paid to the choice of grout for mosaic joints. It should emphasize the laid out drawing. Select grout to match the finish or white mixtures. Sometimes clear epoxy or sodium based grout is purchased. This type of grout looks especially beautiful with added shine.
As for the tool, you need to prepare the following:
- Putty knife.
- Container for mixing the adhesive composition.
- A container for mixing grout, if it is sold unfinished.
- Gloves.
- Rags.
- Sandpaper.
- Soft spatula for grouting joints.
Preparatory work
First of all, think through a drawing of how to lay out the mosaic on the table. Small project You can draw it on a piece of paper and transfer it to the tabletop.

note
If you do not yet have experience, then you should not try to lay out a mosaic of complex shapes. Start with simple pattern. For example, chaotically scattered tiles of different colors, rectangular or square shapes, etc.
The tabletop is also carefully processed. If the surface has paint, it can be completely removed with a solvent. The solvent will also clean the surface well from grease or other contaminants.
Plus, the countertop needs to be sanded. Due to this, the surface will become rough, and this will ensure high-quality adhesion of the surface to the tile adhesive. This is especially important if plastic and similar smooth materials are used as the base.
Important! If you do not prepare the table surface well, this can lead to individual mosaic elements starting to fall off.
Mosaic laying
Let's move on to the main process - laying the mosaic on the table. Place the mosaic on a surface without glue. This will help you see the end result and make some changes if necessary.

note
If you are sure that trimming is not necessary, you can start laying from the far side of the table.
If a pattern is applied to the table and certain calculations have been made previously, then you can start laying with the pattern, which will be located in the middle of the tabletop.
There is no strict rule on where to start laying mosaics; the main thing is to think through everything carefully and calculate it. If you plan to attach a wall plinth near the wall, then it can bridge the small gap between the masonry and the wall. In this case, it is better to start from the edge of the tabletop.

The process of all work comes down to the following:
- The prepared surface is primed in two layers.
- Then apply glue to a small area of the table. The adhesive layer should be minimal; for this, the tabletop is first leveled.
- Next, a special mesh is placed on the glue, and a mosaic is placed on top of it, which must be leveled.
- Another option is to lay out a mosaic on paper, forming separate blocks, and after laying, the paper is soaked and removed.
If the base is level and the layer of glue is minimal, laying out the mosaic with your own hands perfectly evenly will not be a big problem.

After completing the laying, the tile adhesive must dry completely. Also make sure that there is no glue in the seams between the individual elements. After the tile adhesive has completely dried, the joints are grouted with prepared grout.
If moisture is expected, the grout must be moisture resistant. For this, epoxy or latex mastic is used. After the grout has hardened, the mosaic is washed and wiped dry.
Conclusion
As you can see, making a table with your own hands at home is quite possible. Mosaic in this case performs an ideal function. A tabletop made this way will last for many years. In conclusion, we recommend that you watch the prepared video material.
9405 0
If the size of the bathroom allows you to place something else there, in addition to plumbing fixtures, then the most sought-after element in the arrangement of this room will be a durable, beautifully finished mosaic countertop.
Manufacturers of bathroom equipment offer both finished products, already tiled and equipped with a washbasin, and custom-made ones, but the price of these goods and services is quite high. Therefore, a do-it-yourself mosaic tabletop is a rational and completely feasible solution to the problem, if you follow the necessary technologies and recommendations.
Let's break down the entire scope of work on making a mosaic countertop into separate stages:
- Design development and marking of surfaces for installation.
- Manufacturing and installation of a supporting frame.
- Manufacturing and installation of the table top body.
- Covering the table top body.
- Preparing the base for laying mosaics.
- Covering the countertop with mosaic.
Sketch and marking in place
Having decided to make a countertop in the bathroom, they begin to design and mark out the location for its installation.

A mosaic countertop in a bathroom can create a special atmosphere
The surface of the countertop should be at a height of 80 cm above the floor level, and its width and configuration are based on the dimensions of the room and the location of plumbing fixtures.
Having decided on the installation location, draw a horizontal line along the bubble level on the wall, at a height of 80 cm from the floor, along which the tabletop will adjoin the wall.
Then, based on the width and length of the future structure, markings are made on the floor underneath it for the locations of the support legs or transverse partitions on which the tabletop will lie.
Manufacturing and installation of supporting frame
Having completed the markings, we begin to manufacture the supports and frame of the tabletop. To install supports, it is advisable to build transverse partitions from cement blocks, so that in the future you can attach horizontal shelves to them under the tabletop and hang doors. With this solution, the ceramic tile with a solution, previously cut along the removal contour with a grinder and a dry cutter.

Along the line marked on the wall, a horizontal support for the future surface is attached to the wall using a screw-hole connection in increments of 15-20 cm. Then vertical transverse partitions are laid with cement blocks on a cement-sand mortar to the lower level of the horizontal support attached to the wall. After a day, the partitions made from blocks are lined with ceramics, since after installing the countertop it will be more difficult to do this.
For the manufacture of vertical supports (legs) of the table top they are also used. steel profiles rectangular cross-section with dimensions 50 x 30, 60 x 40 and 40 x 40 mm, which are rigidly attached to each other using transverse braces using electric welding.
The supporting frame made from such profiles must be coated with anti-corrosion paint to protect the metal in the humid conditions of the bathroom.
Case manufacturing
The tabletop frame can be easily made from steel CD profiles used when working with plasterboard sheets. By inserting one U-shaped profile into another, a strong hollow steel bar of square cross-section is obtained. Profiles for forming bars and joining each other are connected with metal screws or blind rivets.

Making an exclusive tabletop from mosaic is not so difficult
Regardless of what material the frame lining is made of, the frame itself must be strong enough to withstand the loads from personal hygiene items standing on it and not break if a person leans on it. The body of the countertop is made by attaching rods made of CD profiles to a steel block installed on the bathroom wall and must be in the same plane with it. CD profiles are galvanized, so there is no need to paint the manufactured frame.
Covering the table top body
After making the frame, they begin to cover it with material that will serve as the basis for laying the mosaic.
Drywall
If plasterboard is chosen as such a material, then its type GKLV (moisture-resistant sheet plasterboard) is purchased. Drywall is coated on both sides with two layers of nitro varnish diluted with a nitro solvent. Then onto the sheet that will serve as the top surface, with inside PVA glue is used to glue a reinforcing painting mesh, which will prevent it from deflecting. After gluing, another layer of glue is applied to the mesh with a brush.
The body of the table top is covered on all sides, including the bottom, with plasterboard, which is attached to the body with self-tapping screws. All sections of drywall are covered with a protective layer of nitro varnish, and all joints are filled with silicone sealant “For an aquarium”, the excess of which is immediately removed with a damp rag.

After the silicone has dried, a layer of cheap two-component automotive putty 1-2 mm thick is applied to the top surface and ends of the tabletop with a medium-width spatula, which is prepared in small portions in order to have time to apply it before it loses fluidity.
After an hour, the hardened putty is dry processed to a smooth surface and even corners with coarse sandpaper secured to wooden block. The result is a strong, level, waterproof base, ready for laying mosaics.
Chipboard base
If chipboard (chipboard) is chosen as the material for the base for the mosaic, then only the upper surface of the tabletop is covered with it using self-tapping screws, having previously been coated with a brush with two layers of liquid nitro varnish. A strip of chipboard 5-8 cm wide is attached to the front and side ends with self-tapping screws to add volume to the structure. Then the surface of the chipboard and the joints are also puttied on top and at the ends with auto putty, and then treated with sandpaper.

Preparing the base for laying mosaics
Before laying the mosaic, the surface of the base must be primed with any latex-based primer, which will neutralize dust on the surface and increase adhesion when laying the mosaic. It takes a day for the primer to dry completely.
Finishing the countertop with mosaic
After careful preparation of the base surface, laying the mosaic on the countertop is not difficult. To finish the countertop in the bathroom, use smalt or glass mosaic, matching its color to the overall interior of the room. Mosaics are sold in the form of ready-made matrices measuring 30 x 30 cm on a mesh or paper based. Important! Mosaics on a mesh base are glued with a mesh onto the mortar, and ceramics on a paper base are laid with the paper facing up, after which the paper is wetted and easily removed.
Mosaics in the bathroom are glued with waterproof mixtures based on cement or epoxy. Epoxy compounds provide better water resistance to mosaic countertops, but working with them requires certain skills, and the price of such adhesives is higher. It should be taken into account that the glue under the glass mosaic for the tabletop should be white, since dark glue will distort the color of the transparent mosaic.

The glue is applied to the base with a flat spatula, leveled, and then its excess is removed with a comb spatula. The matrix with mosaic is laid on the glue, evenly pressed across the entire area to the base and leveled with a wide rubber spatula. The next matrix is placed in such a way that the distance between the matrices coincides with the distance between the individual chips in the matrix. In this way, the effect of seamless cladding is achieved. The surface of the mosaic is carefully wiped with a damp cloth to remove any adhesive contamination.
A day after installation, the mosaic joints are grouted with a waterproof compound, the excess of which is removed immediately after application. After half an hour, the mosaic table top is wiped with a clean rag, and after the grout has hardened, the mosaic is polished with dry flannel.
If the listed technologies are followed, a countertop made and decorated with mosaics with your own hands will decorate the bathroom interior for many years.